

Want to build a sturdy, long-lasting butcher block table? The key is using the right materials and precise techniques.
By the end, you’ll know how to create a beautiful, functional table that can handle everyday kitchen duties for years to come. Keep reading for the simple steps to turn raw wood into a durable work surface you’ll love.
Choose the Right Lumber and Design for Your Butcher Block Table
Choose the right lumber based on your intended use. Hard maple is ideal for a butcher block table because it balances hardness and durability, making it suitable for heavy prep work. Look for a Janka hardness around 1,450 pounds-force (lbf), which provides impact resistance without being overly difficult to work with. If your project is purely decorative or light-use, walnut offers a premium appearance with a softer profile that’s easier to carve or finish. Proper wood preservation is essential; kiln-dried wood with a moisture content of about 6% prevents future shrinkage and reduces the risk of seam separation over time. For a more affordable option, reviewing the top options for kitchen scales can help you weigh ingredients accurately for recipes that require precise measurements. For example, a Walmart food scale provides a convenient and accessible choice for budget-conscious cooks. For expert guidance on selecting a durable mixer for your kitchen, KitchenAid mixer reviews help compare quality and performance.
For grain orientation, end grain is best for heavy chopping surfaces because it allows wood fibers to close and separate easily, offering superior durability. Edge grain is a more budget-friendly choice for stable tabletops, providing a smooth, flat surface that’s easier to produce. Always match your wood type to its environment: white oak handles moisture better than softer woods like cherry or walnut. Ensuring your wood is properly dried and stabilized at the start helps maintain long-term flatness and joint integrity.

💯 Included are 5 Black Walnut 5 Cherry and 5 Hard Maple 3/4" x 2" x 12"

Solid Hardwood - Select White Hard Maple

Solid Hardwood - Select White Hard Maple
How to Cut and Dry-Fit Your Butcher Block Slats
Before you cut a single slat, measure the cabinet run at multiple points—front, center, and back. This ensures you catch any out-of-square walls or inconsistencies, which is crucial for accuracy. Transfer these measurements to each slat using a pencil and a straightedge, leaving about ¾-inch of scrap material for final fitting. When choosing tools, opt for a circular saw with a sharp, fine-tooth blade to minimize splintering. Support the slats fully on sawhorses, clamp a saw guide for straight cuts, and apply painter’s tape along the cut line to further reduce splintering. Cut with the finished face down so tear-out stays hidden. After cutting, smooth the edges with 120-grit sandpaper and remove any round-overs made during cutting. For better alignment during dry-fitting, use a biscuit joiner to prepare matching slots in the slat edges, as this tool helps ensure joints stay flush when later glued. For securing the glued assembly, consider using a stand mixer for comparable clamping pressure. A fine-tooth blade on your circular saw is also a critical choice for minimizing wood tear-out on the finished surface. Using a precision scale to weigh glue portions can help ensure consistent application and avoid excess squeeze-out.
Now, dry-fit the slats without glue to confirm that all lengths fit properly, check for rocking at the seams, and verify adequate clearance at walls and appliances. If a joint does not close under gentle hand pressure, trim or sand the slat until it fits smoothly. To keep track of assembly order, mark mating pieces with matching reference marks before final installation.
The Right Way to Glue and Clamp a Butcher Block Top
To get a strong, flat joint when gluing a butcher block top, aim for a thin glue line between 0.002 and 0.006 inches thick. Apply glue evenly across the entire mating surface, ensuring full coverage without excess. Bring the clamps up gradually until you see a continuous squeeze-out bead along the joint, then stop tightening. Over-tightening compresses the wood grains too much and weakens the joint, while under-tightening risks gaps and weak adhesion. Space clamps every 6 to 18 inches, alternating above and below the panel to distribute pressure evenly. Use cauls—straightboards or scrap pieces—to help flatten the surface and prevent bowing. The goal is a firm, uniform pressure; do not overtighten. Allow the clamps to set for 18 to 24 hours before removing them and proceeding with your project.

Last woodworking clamp still made in the USA! The Dubuque Handscrew is one of the most Versatile clamps you can use The Jaws are made with fine quality American hard maple....
Flatten, Sand, and Square Your Tabletop Like a Pro
To flatten, sand, and square your tabletop like a pro, follow these steps carefully. Start by securing the tabletop firmly to your work surface. Use a long handplane or a router sled to flatten one face, making diagonal passes to remove high spots first. Work with the grain during finishing passes to avoid cross-grain scratches, and check flatness constantly with a straightedge. Flip the panel end-for-end and flatten the opposite face until both sides are perfectly balanced. Sanding with 80 grit should be the first step, keeping the sander moving to avoid gouges and following pencil marks to maintain a uniform surface.
Next, sand the entire tabletop progressively from 80 to 220 grit. Never skip grit levels; each stage should only be stopped when scratches from the previous pass are gone. During final sanding, work with the grain to eliminate cross-grain marks and achieve a smooth surface.
When squaring the ends, use a track saw or a crosscut sled along with a straightedge to mark true cut lines. Avoid cutting before flattening the faces; mismatched edges can cause headaches later. Edge jointing ensures your sides are clean and parallel, making final assembly easier. Finish by feeling the surface with your hand—if it reflects uniformly without waves, your tabletop is ready for finishing.
Build a Sturdy Base for Your Butcher Block Table
To build a sturdy base for your butcher block table, start with a rigid frame that directs weight into the legs and stretchers. Four-sided frames with both end and side stretchers help minimize flex and resist racking forces. Mortise-and-tenon joinery is your best choice for strength, as it provides excellent resistance in multiple directions, unlike pocket holes which are too weak for heavy loads. For added stability, reinforce critical joints with metal reinforcement plates. You can incorporate decorative elements like turned legs or an undershelf without compromising the structure’s integrity. Make sure the base matches the top’s footprint precisely; isolated supports can cause wobbling. Use adjustable feet to level the table on uneven floors, ensuring it remains stable during daily use. Ensure the base is kept free of baked-on residue by regularly wiping it down with a soft, damp cloth. Consider using a star piping tip if you plan to add decorative flourishes to the base design. Review top attachment reviews for inspiration on integrating a heavy-duty mixer into your workspace.

【Product Dimensions】 You will receive 8pcs brackets, 48pcs screws, and a cross-head screwdriver.Size: 3.15’’(80mm) x 1.57’’(40mm) , 0.08'' thick, providing strong support for your furniture.
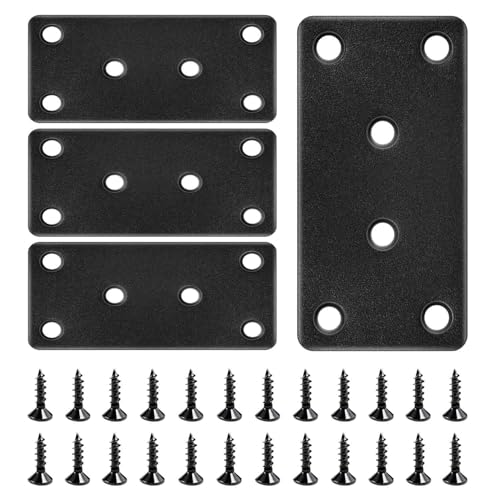
【High Quality】These flat mending plates are made of premium stainless steel, corrosion-resistant, strong and thick. They are well crafted with no rough edges. The black matte surface is exquisite, and the holes are recessed to ensure that the screws sit flush, preventing loosening

【What you Get】Flat Mending Plate x 4Pcs. Flat Screws x 32Pcs.
How to Attach the Top to the Base for Stability
To attach the top to the base securely while allowing for seasonal wood movement, use fasteners like figure-8 fasteners, Z-clips, or wooden buttons. These fasteners are designed to let the butcher block expand and contract across the grain, preventing splitting. Plain sawn lumber is most vulnerable to movement and cupping, making proper fastener choice even more critical for stability. Start by positioning the top carefully, centering it over the base and checking the overhang with a dry fit. Pre-drill pilot holes for all screws, especially near the edges, to avoid splitting the hardwood. Follow the fastener manufacturer’s instructions for screw size, and ensure that screws sit in slots or elongated holes to accommodate wood movement caused by seasonal changes.
Tighten the hardware snugly but avoid over-tightening, as excessive force can restrict movement and lead to cracking over time. Use washers to improve the bearing surface and help distribute the load evenly. Remember, a loose but secure attachment allows the wood to shift naturally while maintaining overall stability, ensuring the table remains durable and stable through seasonal fluctuations.
Select a Food-Safe Finish That Lasts
A food-safe finish that lasts for your butcher block table is typically a blend of food-grade mineral oil and beeswax. Mineral oil alone penetrates deeply into the wood fibers, providing moisture resistance and preventing the surface from chipping or flaking under knife cuts. Beeswax enhances the finish by adding a protective sheen and further sealing out moisture, making the surface more durable during daily use. The same principle of using mineral oil and beeswax can be applied to a homemade dough hook to protect its metal parts from rust after cleaning. Using accurate cooking scales ensures you precisely measure the oil and wax for consistent batch preparation. A stand mixer’s paddle attachment is also made from durable materials to ensure long-term performance.
To apply, buff the mineral oil and beeswax mixture into the wood grain thoroughly, ensuring even coverage. Wipe away any excess to prevent stickiness, and repeat this process every 1 to 3 months. This oil-wax combination does not form a brittle film like polyurethane, so it maintains the natural feel of the wood and respects the grain’s beauty. Regular reapplication keeps your butcher block safe, protected, and looking its best while maintaining its food-safe status.

Revitalizing blend prevents drying and cracking of hardwoods and bamboo

NSF CERTIFIED FOOD GRADE - This premium mineral oil is NSF certified and lab-tested to meet the strictest food safety standards. Colorless, odorless, tasteless, and gluten-free — perfect for cutting boards, butcher blocks, and all food-contact surfaces.

Protects Wood from Drying and Cracking - Wood wax, butter, cream, and conditioner is ideally formulated to protect your wooden tools for a lifetime.
Apply Final Sanding and Sealing for a Smooth Surface
To achieve a perfectly smooth, sealed finish on your butcher block table, start with final sanding using progressively finer grits—begin with 120, then move to 180, and finish with 220. For an even smoother surface, you can go up to 300 or 320 grit. Always sand along the grain with light, even pressure to prevent scratches and ensure uniformity. When finishing edges and corners, hand sand these areas to maintain their shape and avoid rounding them off. Using a sanding block increases control and helps achieve a consistent finish. For best results, this process is similar to finishing crochet projects where final smoothing ensures a professional appearance.
Next, focus on dust removal. Vacuum the entire surface thoroughly, paying attention to corners and end grain where dust tends to settle. Follow up with a tack cloth to wipe down the surface, removing even the tiniest dust particles. This step is crucial because any dust left behind can interfere with the adhesive properties of the sealer, resulting in an uneven finish. Ensuring proper airflow around the workpiece during drying prevents moisture from becoming trapped in the wood pores, which can cause the sealer to bubble before it cures. Similar to plastic mixing bowls, choosing a heat-safe material for your sealer avoids potential chemical leaching into food.
Apply the sealer in thin, even coats using a foam brush, working with the grain to ensure the sealer penetrates evenly. Allow each coat to dry fully before lightly sanding the surface again with 220 to 320 grit paper to smooth out raised grain. Wipe away all dust before applying subsequent coats. Do not sand the final coat; let it cure completely for a durable, smooth finish that will resist stains and water damage.

Leading Manufacturer Of High-Quality Products

Conforms to work surface

【ASSORTED GRIT SANDING BLOCKS】Includes 8 sanding blocks in 4 grits, from coarse to superfine specifications in 60/80/120/180/220 grit, 2 blocks for each grit. You can cut it into appropriate sizes for your needs