

If you’re wondering how to make your cake decorations look polished and professional, choosing the right piping tip can make all the difference. Different tips are designed for specific effects, from clean dots to delicate floral patterns.
Knowing which tip to use for each task ensures your decorating turns out just how you imagined. Keep reading to discover the tips that will elevate your cake artistry.
Round vs. Star Tips: Which to Use and When
A round tip is best suited for precise work. Its smooth, circular opening allows you to pipe clean, untextured lines, making it ideal for writing messages, outlining shapes, or piping dots and beads. With a round tip, you get full control, resulting in sleek, minimalist borders and fine details. It’s the go-to choice when accuracy and neatness are your priorities. To keep your round tips in perfect condition, you can clean silpat mats using the same gentle, residue-lifting methods recommended for delicate baking tools. For consistent performance, pairing your piping tools with a quality stand mixer ensures steady batter preparation free of lumps. Using the right flex edge beaters for your mixer can further improve the consistency of your batter.
In contrast, a star tip excels at creating decorative textures. Its toothed opening forms ridges and points, perfect for classic swirls, rosettes, and shell borders. Open star tips produce lighter, airy ridges, making them ideal for big cupcake swirls and soft textures. Closed star tips, on the other hand, create deeper, more defined patterns for intricate designs. Choose a star tip when you want to add visual impact and textured flair to your decorations.

10-Piece plain pastry tip set

【PACKING LIST】You will receive a set of 20 stainless steel piping tips in 5 different sizes, which can be used to pipe different sizes of buttercream

【Assorted Decorative Set】This set comprises 7 different sizes of icing tips made from stainless steel, allowing for the creation of a wide range of patterns on cakes and cookies. With various size options available, our piping tips set enables both large-scale pattern designs and intricate detailing.
Quick Reference: Match Piping Tips to Any Decorating Task
Matching piping tips to your decorating tasks makes your designs sharper and more professional. For a basketweave effect, use a French or basketweave tip to create woven panels and textured borders on chilled buttercream. If you want sharp, compact star accents, opt for a closed star tip, which is ideal for tiny flowers and intricate patterns. Large open tips are perfect for quick coverage; they handle swirls and ruffles beautifully and support stencil techniques with airy textures. When tackling advanced patterns like fine lattice or lacework, switch to a specialty detail tip. These tips are designed for precise dots, messages, and lines. Keep your icing at the right consistency—stiffer for detailed work and softer for filling larger areas—and you’ll achieve every decorating goal from rustic sides to detailed cupcake tops. For durable results, consider a Hamilton Beach stand mixer with a sturdy metal hub to handle heavy-duty piping work. Accurate ingredient measurement is just as important as the right tip, and a reliable kitchen scale ensures consistent batter and icing density for perfect results. Just as cookie sheet sizes affect baking times, the dimensions and shape of your piping tip directly change the pressure needed and the final design outcome.

Cake Decorating Kit:You will receive 6 fondant tools,it meets your demands for decorating all kinds of cakes and desserts.With these basketweave tips you can make smooth stripes in cakes.
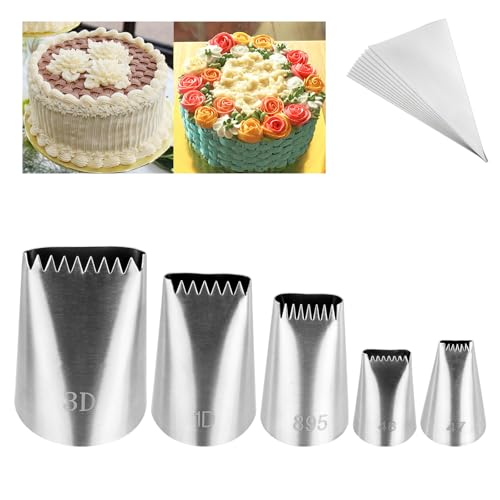
【High Quality Material】The basketweave piping tips are made of stainless steel, it will not easily rust, corrosion resistance, non-toxic and tasteless, can directly contact food, safe and environmental protection, you can use it boldly to ensure absolute safety of you and your family.

Package Includes: You will get 5 pcs flower piping tips, each capable of easily creating beautiful woven, basketry. Our frosting tips come in a variety of sizes, allowing you to easily create a variety of stunning creations
Petal, Leaf, and Drop-Flower Piping Tips for Simple Florals
Petal, leaf, and drop-flower tips are essential tools for creating simple floral decorations. You’ll use them to build everything from a single rose to an entire buttercream bouquet. For petal tips, angle the narrow end toward the center of the flower and squeeze the bag steadily, maintaining contact with the surface to produce smooth, natural-looking petals. V-shaped leaf tips are ideal for making leaves with a central rib; pull straight for a broader leaf or add a slight back motion to create longer, tapered leaves. Drop-flower tips allow you to pipe multiple petals with a single squeeze-and-turn motion, finishing each flower with a dot or nonpareils for added detail. For instance, the Russian tips can pipe multiple flower shapes and colors in one squeeze, incorporating dots for stamens and curved lines for petals to create layered designs. Selecting the right tip size ensures the scale of your floral decorations matches the cake design. For stiffer results, piping directly onto a baking sheet provides a stable surface that withstands chilling without bending. When scaling up your flower decorations, a loaf pan for shaped cakes offers a similar logic to selecting the right tip size for consistent baking and presentation.
Color mixing plays a crucial role with these tips—swirling two shades inside the piping bag creates depth and dimension within your flowers. Proper icing consistency is also key: stiffer buttercream keeps petals upright for a more realistic appearance, while softer icing is best suited for drop flowers, making petals easier to form. Before transferring your piped flowers onto frosted cakes, chill them briefly; this helps set their shape and ensures cleaner placement.

【Package Includes】You will receive 5pcs flower piping tips(corresponding to labels 101s,101,102,103,104,)with which you can create all kinds of flower patterns on cake.

【Effortless Floral Designs】Create stunning floral patterns with ease using our drop flower piping tip set. Designed for both buttercream icing, these cake piping tips allow you to pipe intricate flowers and borders with a single squeeze, transforming your cakes and cookies into art

Material: high quality stainless steel.
Decode a Piping Tips Chart for Size and Icing Consistency
Matching tip size with icing consistency is essential for successful piping. Small tips, like #1 through #3, require thinner, smoother icing that flows easily without clogging the small opening. These tips are best for fine writing, delicate details, and intricate designs. Larger tips, such as #12 or #55, handle stiffer icing that maintains shape and prevents clogging, making them ideal for bold borders or fill work. Just as hot pads protect your hands from kitchen heat, the right tip and icing match prevents frustration during piping. When selecting a hand mixer for your baking tasks, choosing attachments that correspond to icing consistency is just as critical for smooth results.
To determine the right consistency, adjust your icing so it holds peaks for crisp outlines or self-levels for fills. Test your icing before piping on the actual project: if it breaks mid-squeeze, it is too stiff. If it spreads out flat and fails to hold shape, it is too thin. Always match the smallest tip size that allows smooth, controlled flow of your icing—this ensures precision without clogging or uneven lines. A butcher block DIY table is a strong, durable surface that benefits from careful material matching, similar to how a piping tip must match icing consistency.

1. Eco-Friendly & Extremely Durable Silicone Say goodbye to single-use plastics. Crafted from premium, food-grade silicone, these reusable piping bags are engineered to withstand over 500 heavy-duty squeezes without stretching, tearing, or blowing out. It is a sustainable choice that significantly reduces kitchen waste while providing professional-grade reliability for your thickest doughs and buttercreams.

Riccle Piping Bags and Tips Set, 11.8 Inch 100 Anti Burst Piping Bags, 124 Pcs Cake Decorating Kit with 16 Piping Tips, 1 Reusable Pastry Bags, 3 Cake Scrapers

Essential Cake Decorating Tools: Getting ready to decorate but not sure what tools you need? RFAQK offers a complete set that includes everything you need to start decorating Cakes like a PRO! 48 Numbered Easy to Use icing tips, with E-Book in PDF, a booklet and a complete video course showing the outcome of each Icing Nozzle,2 icing couplers, 20 disposable icing bags (12-inch), 1 Reusable pastry bag (12-inch), Flower nail & lifter, Cleaning brush, Storage box that keeps everything organized
When to Use Specialty Tips for Basket Weave and Textures
Specialty tips are essential for creating textured and structured effects like basket weave on your cake sides. Use a basket weave tip when you want a clean, repetitive woven pattern that resembles a traditional basket. These tips have dual smooth and ridged sides, which help produce alternating stripes that add realistic depth. For best results, hold the tip with the ridge side facing up to ensure consistent woven lines. Wider or oversize basket weave tips can also be used to create bold zigzags or larger borders that are visible from a distance. For precise measurements, refer to standard measuring spoon sizes when combining colors or flavorings. When selecting a basket weave tip, consider the same quality and performance factors used to judge top pasta rolling pins for consistent, durable results. For best results, preheat your mat gradually to prevent warping and ensure even heat distribution across the surface.
For other surface textures, different tips serve specific purposes. Grass tips pipe multiple strands and are great for fur, grass, or flower centers. Star tips, whether open or closed, are perfect for beaded, roped, or shell-like textures. Larger tips work best for bold patterns that need high contrast, while smaller or more detailed tips suit intricate designs. Combining various tips allows you to build complex decorations and add dimension where smoothness is not the goal.

Extra Large Basketweave Tips: Create wide woven patterns, and textured cake details with three large piping tips in sizes 200, 201, and 202

What you get: You will receive 5 piping nozzle sets, sufficient quantity and various sizes to meet most of your design needs in daily life
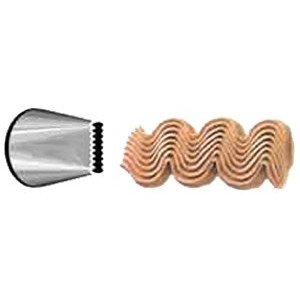
Bend-resistant stainless steel