

Finding the right loaf pan size can be confusing, especially when recipes often assume a standard dimension. Most commonly, you’ll see pans that measure around 8½ x 4½ inches or 9 x 5 inches, each holding different amounts of batter.
Knowing how these sizes affect your baking helps you get perfect, evenly risen loaves every time. Keep reading to learn how to choose, measure, and adjust your pans for ideal results.
Why Your Loaf Pan Size Matters More Than You Think
A change of just half an inch in each dimension of your loaf pan can alter its capacity by approximately 15 percent. This size difference significantly impacts how your bread rises, affecting its height, shape, and texture. Using a pan that’s too small will force the batter upward, often creating a tall dome or overflowing. Conversely, a larger pan allows the batter to spread more sideways, resulting in a flatter loaf with little to no rise. Material choices also play a role—metal pans heat faster than glass, which can change baking times and results. Therefore, matching your pan size carefully to your recipe is key to achieving consistent, evenly textured bread. If you switch pans without adjusting your recipe, you risk ending up with a dense center or a burnt exterior. For those frequently adjusting recipes, the right Kitchenaid mixer attachments can help ensure consistent batters for any pan size. To keep your pans in peak condition and prevent baked-on residue, you can use gentle cleaning methods similar to those advocated for non-stick bakeware. Many bakeries rely on Hamilton Beach stand mixer attachments for their durability and range of mixing options.
Is 8½ X 4½ or 9 X 5 the True Standard Loaf Pan Size?
The true standard loaf pan size is typically 8½ x 4½ inches. This vintage, classic size holds about 6 cups of batter, resulting in a taller, domed loaf that’s familiar to many traditional recipes. The 9 x 5-inch pan, holding roughly 8 cups, is considered the contemporary standard, used mainly for quicker breads and sandwich loaves.
Choosing between the two depends on your goals: the 8½ x 4½ pan produces a more classic, taller loaf, while the 9 x 5 offers a larger, flatter shape ideal for slicing thinner. Keep in mind that pan material and brand differences can affect the actual volume and baking results. Metal pans conduct heat differently than glass, which may impact how your bread bakes. Always check your recipe’s era and intended loaf volume to select the correct size. Neither pan size is universally correct; the right choice depends on your specific recipe and desired outcome.

USA Pan standard commercial gauge folded loaf pan is ideal for quick breads, yeast breads, pound cakes or even meat loafs; pan baking dimensions are 8.5 x 4.5 x 2.75

USA Pan classic nonstick loaf pan measures 8.5 x 4.5 x 2.75 - the perfect size for yeast breads, quick breads, pound cakes or even meat loafs

SET OF TWO 8 x 4-INCH MEDIUM LOAF PANS: Great for baking meatloaf, sweet or savory breads, thick cakes or brownies, smaller portions of lasagnas or casseroles, and more for the perfect bake every time
How to Measure Your Loaf Pan’s Actual Capacity
To measure your loaf pan’s actual capacity, start by taking inside-edge measurements. Measure the length, width, and depth from the bottom straight up to avoid distortions caused by the metal thickness. Note any tapering at the top, as it can affect the total volume. Then, perform a water-fill test: fill the pan with measured water using a cup until it reaches the rim. Pour this water into a liquid measuring cup to determine the volume. For greater accuracy, use a digital kitchen scale—tare the empty pan, fill it with water, and record the weight in grams. Since 1 gram of water equals 1 milliliter, this gives you the capacity in milliliters directly. Divide the milliliters by 237 to convert to cups. Keep records of both the measurements and water capacity in cups and milliliters. These details ensure you know your pan’s true usable volume, allowing you to adjust baking times and oven temperatures precisely, and they can be handy for future recipes. After your water test, you can also apply gentle scrubbing methods, similar to those used for silicone baking mats, to remove any residue left from previous bakes. For the best results, use a baking sheet cleaning technique that starts with a paste of baking soda and hydrogen peroxide to lift stubborn, baked-on residue. Unlike bundt pans, which often have intricate fluted designs, a loaf pan’s straight sides make it much easier to measure precise water volume without spillage or trapped air pockets.
What Size Loaf Pan Does Your Recipe Really Need?
Your recipe’s pan size needs are precise—most yeast bread recipes call for either an 8½ x 4½ inch or a 9 x 5 inch loaf pan. These dimensions are chosen because proofing, rising, and shaping depend on the volume of the pan. Quick breads are more forgiving and can often work in either size, but you’ll need to adjust your oven temperature and baking time accordingly. If your recipe calls for about 3 cups of flour, opt for the smaller pan; if it’s closer to 3¾ or 4 cups, the larger pan is better. Overfilling a pan can lead to overflow during baking and uneven results, so always verify the actual measurements rather than relying solely on the “standard” label. Using dry measuring cups for flour ensures the correct volume and avoids compacting, which can throw off the recipe. For example, understanding exact numbers like the volume difference between these two pans can help you choose the right one for consistent results. Consistent results also depend on proper mixer adjustments to ensure your dough is evenly mixed and properly developed.

PROFESSIONAL GRADE CONSTRUCTION: Made from heavy-weight aluminized steel for superior heat conduction and even baking results; Delivers consistent, golden-brown loaves every time

USA Pan one pound loaf is commercial grade and heavy duty aluminized steel; baking dimensions measure 8.5 x 4.5 x 2.75 inches

8.5*4.5 inch cast iron loaf pan, suitable for full size loaf bread. You can make two loaves at once, or use the 2nd pan as a lid. Perfect for making homemade sliced bread for sandwiches.
U.S. vs. UK Loaf Pan Sizing: Don’t Trust the Label
A U.S. “standard” loaf pan typically measures 8½ x 4½ inches, while a UK “standard” loaf tin is defined by a weight—usually 1 or 2 pounds of dough—rather than specific dimensions. This difference matters because the internal volume and shape may vary significantly even within tins labeled as “standard.” Simply trusting the label can lead to mismatched bakeware for your recipe, resulting in uneven baking or ruined textures. For precise measurement, consider using top measuring cups that feature a 3/4 cup marking for accurate ingredient portions. The key issue is that the UK’s 1lb or 2lb tins are based on dough weight capacity, not exact measurements. A 2lb UK loaf tin might hold a different volume than a 9×5-inch U.S. pan. As a result, your batter could overflow if the pan is smaller, or the loaf could turn out flat and dense if the pan is larger than expected. Always verify actual internal dimensions before baking. To avoid these pitfalls, look for a bacon rack for oven that emphasizes precise fit and consistent heat distribution, though it’s not for bread. Proper sizing ensures your ingredients and baking times stay on target, leading to perfect bread every time. Using durable oven gloves ensures safe handling when adjusting pans during baking.

Even Heating for Baking – Premium carbon steel material ensures consistent heat distribution for evenly baked bread, banana bread, and meatloaf. This 8x4 loaf pan delivers golden-brown crust and tender interior every time

8 x 4-INCH LOAF BAKING PAN: Great for baking meatloaf, sweet or savory breads, thick cakes or brownies, smaller portions of lasagnas or casseroles, and more for the perfect bake every time

COMMERCIAL GRADE 18 GAUGE ALUMINUM the choice of professional bakers, Overall dimensions: 10.25 x 5.75 x 3 inch, Interior dimensions: 8.5 x 4.5 inch
How to Adjust Batter for a Different Pan Size
To adjust batter for a different pan size, start by measuring the new pan’s capacity—you can do this by filling it with water to the brim and noting the amount in cups or milliliters. Divide that volume by the original recipe’s pan volume to find your scaling factor. Multiply each ingredient by this factor to keep your batter’s consistency balanced, preventing a dry, dense loaf or a thin, underbaked one.
Fill the pan about halfway to two-thirds full to allow room for rising. If you have leftover batter, bake it separately as a smaller batch. If your new pan is smaller, expect a smaller loaf; if larger, be prepared for a bigger one. Adjust your oven temperature accordingly: reduce it by 25°F for wider, shallower pans to prevent overbrowning, and check for doneness 10–15 minutes earlier than usual. For deeper pans, increase the temperature slightly and expect to bake 10–20 minutes longer. Always test with a toothpick inserted into the center to confirm doneness.
When to Use a 1-Pound Loaf Pan (8½ X 4½ Inches)
A 1-pound loaf pan measuring 8½ by 4½ inches is ideal when baking pound cakes, quick breads, or yeast breads. Its narrower cross-section produces taller, more domed loaves that resemble the classic homemade look. This size is also a better fit for older recipes that specify a 9×5-inch pan. Additionally, you can use it for meatloaf or recipes calling for about 3 cups of flour, making it a versatile choice in your bakeware collection. For safe handling of hot pans, consider using silicone oven gloves for a secure grip and heat protection. Constructed from heavy-weight, durable carbon steel with folded corners and wire-rod reinforced rims, this pan prevents warping during baking. For frozen desserts like ice cream cakes, a springform pan offers the advantage of easy release and clean slicing. When mixing heavy doughs for these loaves, a KitchenAid mixer with pasta attachments provides the necessary power and versatility for consistent results.
![Waytiffer Loaf Pans [25 Pack] 2Lb Heavy Duty Disposable Aluminum Foil Premium Bread Tins Standard Size - 8.5" X 4.5" X 2.5" Perfect for Homemade Cakes & Breads](https://m.media-amazon.com/images/I/41Oo8cFzkmL._SL500_.jpg)
STANDARD SIZE--- Pans Dimensions: 8.5”L x 4.5” W x 2.5”H,Great for holding bread, cookie and cake batters, fruit and veggie salads, quiches, and beyond.

8.5*4.5 inch cast iron loaf pan, suitable for full size loaf bread. You can make two loaves at once, or use the 2nd pan as a lid. Perfect for making homemade sliced bread for sandwiches.

VALUE PACK OF 50: Ample supply of 50 aluminum loaf pans for baking multiple loaves at once or repeated use; suitable for holiday baking, meal prep, or gifting homemade bread to friends and family
Choose the Right Loaf Pan Shape: Mini, Standard, or Pullman
Choosing the right loaf pan shape depends on the look and structure you want for your bread. Mini loaf pans produce small, individual loaves that are perfect for gifting or controlling portion sizes. Standard pans create a broad, rounded loaf with a dome top, ideal for quick breads and everyday sandwiches. Pullman pans, also known as pan loaf pans, result in a square, uniform loaf with sharp corners and a level top—perfect for neatly sliced sandwiches. The shape of your pan influences how the loaf rises, its crust, and even baking time. Proper pan performance relies on quality roasting racks and even heat distribution, as highlighted in top pan reviews. For sourdough specifically, models with heavy-gauge steel improve stability and browning. Selecting a pan with a seamless one-piece design prevents warping and promotes consistent baking results. Match your pan choice to the batter volume and desired loaf appearance to achieve the best results.
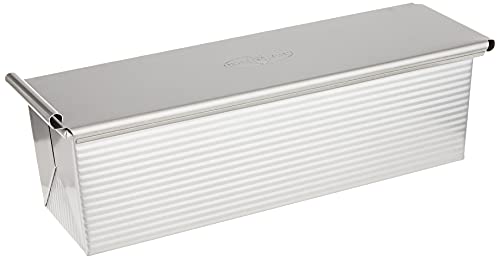
USA Pan baking pans feature Americoat which promotes quick release of baked-goods plus fast and easy clean up; wash with hot water, mild soap and gentle scrub brush or sponge

Medium Pullman loaf pan has a cover and consistently bakes beautiful bread commercial grade and heavy gauge aluminized steel with a Lifetime

Two Pullman loaf pans with sliding lids make square sandwich bread at home.
How to Tell If Your Loaf Pan Is Too Small or Too Large
If your loaf pan is too small or too large for your batter or dough, you can often tell before baking. For batter, aim to fill the pan about two-thirds full; for dough, around halfway is ideal. If the batter rises above these marks or the dough crowds the rim, your pan is too small. Signs include overflow during baking, a domed top that looks strained, or burnt edges, which all indicate the pan can’t contain the volume properly. For precise results, consider using a kitchen scale to accurately measure your ingredients before filling the pan. Conversely, if the batter sits below the halfway mark or your dough looks flat and sparse in the pan, the pan might be too large. This results in a loaf that is squat, dense, and lacks proper oven spring. Instead of trying to fix the problem with ingredient substitutions, it’s better to adjust your recipe or switch to a different-sized pan. Always make sure to follow the recommended fill levels for your specific pan type to ensure your loaf develops a balanced texture with a well-formed crust and properly cooked center.