

Greasing a cake pan might seem straightforward, but doing it right can save you from sticking disasters and damaged cakes.
Using the right fats and techniques ensures your baked goods come out clean and intact every time.
With just a few simple steps, you can master a foolproof method that keeps your cakes perfect and easy to remove.
Follow along to learn how to prep your pan like a pro.
Why Does the Way You Grease a Cake Pan Matter?
The way you grease a cake pan matters because it directly affects whether your cake will release cleanly or stick. Proper greasing creates a nonstick barrier that prevents batter from bonding to the pan’s surface. The method you use should be adapted based on the pan material: nonstick pans need only a light coating, while dark metal or glass pans benefit from thorough coverage to prevent scorched edges. Without proper coverage, dry patches can grip the batter, leading to tears in delicate crumb structures when you unmold. For those seeking reliable kitchen tools, comparing top rated food scales can help ensure precise ingredient measurements for consistent results. For bakers who frequently experiment with doughs, a KitchenAid mixer attachment can streamline the process of incorporating fats and batters evenly. Additionally, knowing the fill level before greasing ensures you don’t overfill or underfill, which affects batter spread and adhesion to the pan’s sides.
Your technique also influences the crust’s quality. Uneven greasing results in rough, over-adhered edges, while too much fat can leave a greasy residue on the finished cake. To avoid this, apply a thin, even coat from the bottom to the sides immediately before adding the batter. This prevents excess pooling and ensures consistent release. Correct greasing not only saves wasted cakes but also makes cleanup easier and guarantees more reliable results every time.
Gather These Tools Before Greasing Your Cake Pan
Before you start greasing your cake pan, gather the essential tools to make the process smooth. Keep a dedicated silicone pastry brush nearby, especially useful for reaching corners without stray bristles falling into your batter. If you prefer disposable options, a clean paper towel or cloth works well for spreading grease evenly. For lining the pan, have scissors ready to cut parchment paper to the precise shape needed, or opt for pre-cut parchment circles for convenience. Use a small mesh sieve to dust flour evenly—unsweetened cocoa powder can be a good alternative for chocolate cakes. Keep a spoon handy to tap off excess flour and paper towels for quick cleanup. A bowl for melted grease is also essential. Organize all these tools beforehand to ensure a seamless greasing, lining, and flouring process. If your recipe requires chilling after coating, have the freezer prepared in advance to save time. For added convenience, you can also lay down a silicone baking mat to protect your countertop during messy steps. For specific decorative finishes, consult a piping tips chart to select the right nozzle for your cake’s design. If your mixer bowl gets stuck during prep, checking the bowl lift mechanism can often resolve the issue.

Unique bristle design won’t retain odors or clump during cleaning
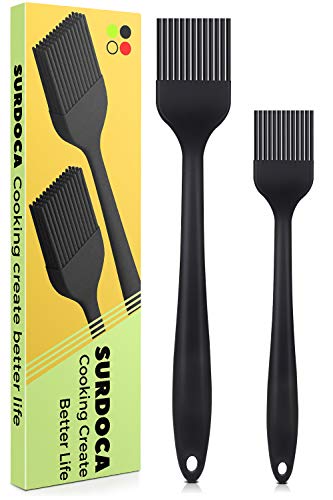
100% BPA FREE & FOOD GRADE SILCIONE : This silicone basting brush made of 100% BPA FREE food grade silicone. All bristles of this basting brush set are BPA-free material which are safe and good for your health. whole basting brush body covered by soft silicone material which can offer you perfect using feeling. At the same time, this basting brushes kitchen silicone is non-staining and won't pick up food particles (unlike wooden basting brush).
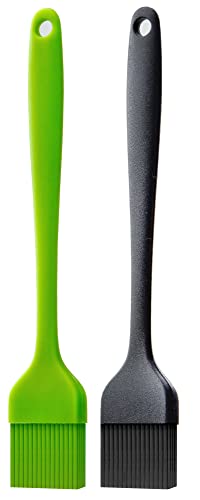
BPA FREE silicone brush.
Which Fat Works Best for Greasing a Cake Pan
Vegetable shortening works best for greasing a cake pan. Its pure fat creates a strong barrier, which helps the cake release easily after baking. The higher melting point of shortening remains effective throughout the baking process, preventing sticking even at higher oven temperatures. Because it has a neutral flavor, it won’t alter the taste of your cake, making it especially suitable for detailed or intricate pans where easy release matters most. For even cleaner results, you can also pair your greased pan with non-stick baking sheets for extra protection.

The original. The classic blue can no pantry should be without. Use it for baking, frying, or just to feel like a rock star in the kitchen. Crisco is Baking

Naturals bakeware is made of pure aluminum which will never rust for a lifetime of durability. Foods bake and brown evenly due to aluminum’s superior heat conductivity.

Made from palm oil
How to Grease Every Surface, Including Tricky Corners
To ensure every surface is properly greased, you need to cover all areas including the bottom, sides, corners, and up to the top edge. Pay special attention to the inner seam where the bottom meets the sides, as this is a common sticking point. Use a pastry brush or your fingertip to press grease into tight crevices, especially in intricate pans like Bundts or decorative molds. For tricky corners, an effective alternative is to use a small piece of parchment paper to push fat into seams that a brush might miss. Applying baking spray from multiple angles also helps reach detailed surfaces more thoroughly. For those using a KitchenAid mixer bowl, similar attention to top quart bowls ensures even coating and clean release from the mixing surface. For ice cream cakes, a springform pan benefits from the same careful greasing of its seam and latch corners to prevent sticking during assembly. Knowing the dimensions of your pan, such as a standard half-sheet pan, can help you estimate the exact amount of fat needed for even coverage.
While spreading the grease, rotate the pan to maintain an even coating. Look for a continuous sheen across all surfaces, especially in corners and seams—these areas are the most prone to sticking if neglected. If you notice any dry spots, recoat immediately to ensure a uniform, non-stick surface. Remember, missing corners can leave edges that stick even when the rest of the cake or baked good releases easily. Proper coverage in every nook and cranny is essential to prevent sticking and make your release flawless.

Fat-free cooking spray, 5 ounces

Gluten-Free: La Tourangelle Baking Spray is gluten-free. Many other baking sprays contain flour to keep them non-stick, however La Tourangelle uses lecithin, a plant-derived non-stick agent.

ALL-PURPOSE SPRAY: All- Purpose Professional no stick cooking spray.
When and How to Flour the Pan After Greasing
Once your cake pan is evenly greased, including the tricky corners, you should add a light flour coating if extra release insurance is desired. Do this immediately after greasing while the grease is still moist, preventing it from drying out. Use about one to two tablespoons of flour for a standard-sized pan, just enough to create a thin dusting. Tilt and tap the pan to distribute the flour over the bottom and sides evenly, allowing gravity to reach every corner. Invert the pan and tap out any excess flour over a sink to avoid leaving a thick layer.
Too much flour can dull the pan’s appearance and leave a dry crust on your cake, subtly affecting the flavor. Flour is not always necessary and depends on your recipe—some batters release easily on their own. A light coating typically won’t affect the cake’s texture but adds an extra safeguard against sticking, especially with richer or more delicate batters. If you prefer a perfectly smooth surface, you might skip the flour entirely.
Use Parchment Paper for Foolproof Cake Release
Using parchment paper for cake release is highly effective when done correctly. To ensure foolproof removal, cut a liner that matches your pan’s shape. Begin by lightly greasing the pan so the parchment stays in place. For round pans, fold the paper into quarters and trim the curved edge to create a perfect circle. For square or rectangular pans, cut the parchment so it covers the bottom and extends up opposite sides, forming a sling. For dough that requires thorough kneading, a spiral mixer provides consistent results. Many home bakers also use a flat beater for creaming butter and sugar to a light texture before folding in dry ingredients.
Leave about 1 to 3 inches of overhang above the edges of the pan. After baking, grab this overhang with your fingers or a cloth and lift the cake out smoothly. This method prevents flipping or flipping accidental damage, making delicate cakes easier to handle. When properly fitted, the parchment lies flat and prevents sticking, simplifying cleanup. Remember to grease beneath the parchment to ensure it adheres well, providing a reliable non-stick surface every time. However, bundt cake pans often have intricate fluted designs that make parchment paper impractical to shape.

PREMIUM QUALITY: Our parchment paper circles are designed with food grade paper, non toxic, 100% safe. Heat resistance up to 446 degree F (230 ℃) , perfect for toaster oven, tortilla press, round cake pan, cheesecake pan, air fryer and so on.

Perfect Fit: Custom-designed for the 9x5inch pans. The bread pan liners parchment compatible with 2 lb loaf pans are designed with a rectangle bowl shape, which do not need to tear, fold, cut, nor bend, and you can directly put it in when you are ready to cook. Fitting size make for a much faster and easier cooking and baking experience in kitchen.

Size information: 6 inch cake pan liners with 7.5 cm lift tabs, 8 inch cake pan liners with 8 cm lift tabs, 9 inch cake pan liners with 8 cm lift tabs
Avoid These 5 Common Pan-Prep Mistakes
Even with the best pan-prep techniques, mistakes can still cause sticking or uneven results. First, make sure you cover every inch of the pan surface; missing even a small patch leaves areas prone to sticking. Use enough parchment or grease to create a complete barrier. Second, pay attention to the amount of grease you apply. A thick layer can lead to greasy, uneven crusts, while too little might not prevent sticking. Aim for a thin, even coating that just covers the surface. Third, don’t skip flour when it’s part of the recipe. Grease alone often isn’t enough to prevent sticking, especially with delicate batters. Lightly flour the greased surface to enhance release. Fourth, after applying flour, tap out any excess; a dusty buildup on the surface can mar the appearance of your baked good. Use a gentle tap or shake the pan to remove loose flour. Lastly, prepare the pan right before pouring in the batter. Delaying can cause the coating to dry out or peel. Setting up your pan immediately before baking ensures the coating stays intact and performs as intended. Combine these steps with proper bake times and cooling techniques, and you’ll minimize most pan-release problems. Using parchment paper cut to fit the pan bottom creates an especially reliable release for dense batters.

BAKE AGAIN AND AGAIN WITHOUT DISPOSABLE LINERS: Upgrade from thin, flimsy parchment papers to this 0.7mm silicone baking sling. Reinforced handles lift cakes and bread effortlessly, while the nonstick surface releases food cleanly and rinses in seconds. Durable, eco-friendly, and reusable for 2,000+ bakes—our included reusable silicone liner helps reduce waste and saves money with every batch.

PREMIUM QUALITY: Our cake pan liners are designed with food grade paper, non toxic, eco-friendly, 100% safe. Heat resistance up to 446 ℉ /230 ℃, perfect for cake pan, cheesecake pan and so on.

Size/Color: Package includes 200 pieces natural parchment cupcake liners. The bottom diameter is 1.97 inches (5 cm) and the height is 1.37 inches (3.5 cm), fitting perfectly into a standard muffin or cupcake pan.
What to Do if Your Cake Still Sticks to the Pan?
Cooling the cake completely before attempting to remove it from the pan is essential to prevent tearing and sticking. Allow the cake to rest on a wire rack at room temperature, or if you’re pressed for time, place it in the fridge for a brief chill—about 15 to 30 minutes. Once cooled, use a thin, flexible knife to carefully run around the edges of the pan, keeping close to the sides to avoid slicing into the cake itself. For the best results, using a quality square pan ensures even heat distribution and non-stick performance.
If the cake remains stubborn, try gently tapping the inverted pan or placing it on a warm, damp towel to help the metal expand slightly, making it easier to release. For particularly stubborn cakes, avoid force; instead, gently wiggle the pan or tap it to loosen the sides. If pieces break off during removal, don’t panic. Reassemble the pieces on a plate and use frosting or glaze to hide cracks or gaps. Alternatively, you can turn a damaged cake into a trifle or trim rough edges for neat, uniform squares. Even with damage, clever decoration can make your cake look appealing. Using a precise kitchen scale for your sourdough starter ensures consistent hydration levels, which can help prevent baking mishaps like stuck cakes. For the lightest results, an ungreased tube pan is essential to allow the batter to climb the sides properly.