

Getting a cake to release cleanly from a pan can be tricky, especially if it’s sticking or breaking apart. Luckily, there are simple tricks to help your cake come out intact and looking perfect.
From gentle warming to chilling strategies, you’ll learn how to rescue your cake before the final presentation. Keep reading for easy release methods that really work.
Why Your Cake Sticks and How to Fix It Fast
To prevent your cake from sticking, make sure to grease every part of the pan thoroughly—especially the bottoms and corners—and then add flour or line it with parchment paper to create a complete barrier. Even with perfect preparation, the cake can stick if the texture is weak; underbaked cakes tend to tear when you try to remove them instead of releasing cleanly. Ensure the cake is baked until the center is fully set. The material of your pan also influences sticking: scratched nonstick or bare aluminum surfaces can hide sticking points. Additionally, high-sugar batters caramelize into a glue at the edges, and as the cake cools, sugar and fat harden into bonds that make removal difficult. Letting the cake cool completely in the pan can worsen this bond, so for easier release, transfer the cake to a cooling rack soon after it comes out of the oven. For angel food cake specifically, an ungreased tube pan is critical because the batter needs to climb the sides for proper rise. Therefore, don’t just coat the pan—bake your cake completely and time the cooling process carefully to avoid sticking problems before they start. Using a KitchenAid mixer attachment like a flat beater can help ensure your batter is evenly mixed, reducing weak spots that lead to sticking.

PREMIUM QUALITY: Our parchment paper circles are designed with food grade paper, non toxic, 100% safe. Heat resistance up to 446 degree F (230 ℃) , perfect for toaster oven, tortilla press, round cake pan, cheesecake pan, air fryer and so on.

Size information: 6 inch cake pan liners with 7.5 cm lift tabs, 8 inch cake pan liners with 8 cm lift tabs, 9 inch cake pan liners with 8 cm lift tabs

Perfect Fit & Extra Long: Customizable Size for Any Pan. Never struggle with mismatched liners again. Our 2.75" x 164ft parchment paper roll offers maximum flexibility, allowing you to cut the exact length needed for round, square, or springform pans. One roll provides enough cake pan side liners for hundreds of baking sessions, ensuring a professional edge for every cake.
Quick Release Tricks When the Cake Won’t Budge
To release a stuck cake from the pan, start by gently running a butter knife or offset spatula around the edges to detach it from the sides. Work slowly and carefully around the full perimeter, including any central tube, using a duller tool to prevent scratching the pan. If you encounter resistance, pause to avoid tearing the cake. Always use proper oven gloves when handling hot pans to prevent burns during this process. For angel food cake, consider using a specially designed tube pan to avoid sticking issues altogether. For cheesecake specifically, running a warm knife around the edge can help release it from a springform pan more easily.
Next, place a plate or cooling rack over the top of the pan, then invert it in one smooth motion. Tap the bottom gently to loosen the cake, and if needed, shake the pan slightly. Leave the cake inverted for 10 to 15 minutes—gravity will help it come free. For extra assistance, chilling the pan in the fridge for the same duration will firm up the cake, making it easier to remove. Alternatively, placing the pan in the freezer for about 30 minutes causes contraction from the sides, easing release.
If only part of the cake comes out, slide a flexible spatula under the loosened sections to help lift them out intact. Use slow, controlled motions to maintain the cake’s shape, which is especially helpful for decorating and serving purposes.

PERFECT FOR MAKING ALL YOUR FAVORITES like cheesecake, mousse, quiche, coffee cake and any similar recipe where you can't turn the pan upside down to remove the cake. These pans can be used to create beautiful three layer cakes suited for any occasion.
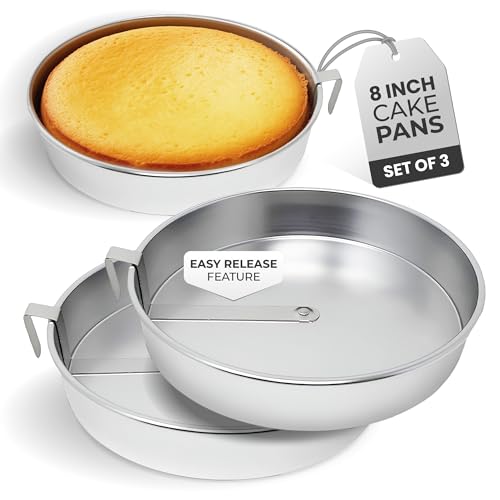
Easy and Fun Cake Removal – Releasing cake from a pan shouldn’t be frustrating. Make it easy with these nonstick cake pans! Designed with a built-in swivel blade, our easy-release cake pans let you remove your perfectly shaped cakes with ease.
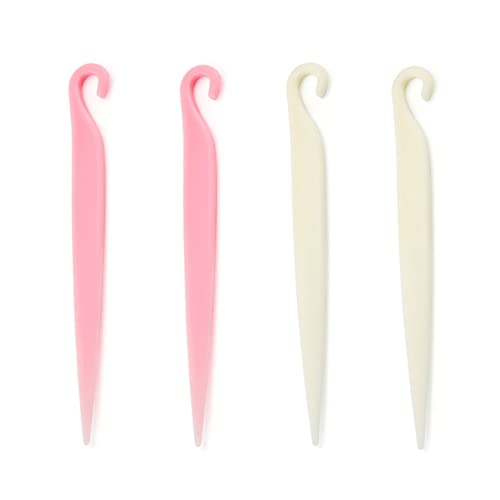
Package Contents: 4 X Cake Stripping Knife(white+pink)
Heat It Up: Loosen a Stuck Cake With Warmth
To loosen a stubborn cake with warmth, you should use gentle heat to expand the pan’s metal and break the baked-on residues. Start by sliding a dull knife around the edge of the pan to loosen the cake from the sides. Next, soak a clean towel in hot water, wring out excess moisture, and wrap it around the base of the pan. The steam from the towel creates a delicate heat that helps expand the metal and release the cake without damaging nonstick coatings. Depending on your pan’s shape, you may need to cover the entire exterior or just the base. Allow the wrapped pan to sit for 1–2 minutes before inverting onto a plate, tapping gently to release the cake. If the cake remains stuck, repeat the towel-wrapping step and try again. Alternatively, dip the bottom of the pan into hot water for just a few seconds, ensuring you never soak it or expose it to direct heat, which can harm nonstick surfaces. Using cautious, damp warmth is key to avoiding damage and successfully loosening a stuck cake, much like how precise temperature control ensures accuracy in a food scale’s performance. Having the right tools on hand, such as an offset spatula or a small piping tip for detail work, is similar to assembling a DIY decorating kit for custom cake finishing. For silicone-based bakeware, baked-on residue can be lifted by soaking in warm soapy water before gentle scrubbing.

Ready, Set, Bake: Wilton has the perfect baking sheets for oven set to help you make your favorite foods. Make a layered sheet cake with ease using one baking sheet.

LARGE RECTANGULAR SHEET PAN: Includes 1 sheet pan (11 x 15 x 2 in.) with tall sides for party-size cakes, layered desserts, bar cookies, and casseroles.

Ideal for birthday cakes, smash cakes or special occasion cakes for you and your loved ones
Cool It Down: Chilling and Resting for Clean Release
Allowing your cake to rest in the pan for 10 to 15 minutes after baking leads to a cleaner release because cooling triggers two key effects. First, the crumb tightens and gains strength, helping it hold its shape during inversion. Second, the pan contracts slightly—a process called pan shrinking—creating a small gap between the cake and the metal. This gap reduces friction, making it easier for the cake to slide out. Waiting this amount of time allows the cake to stabilize and shrink from the edges naturally. If you’re in a rush, a quick 10 to 15-minute rest in the fridge can firm up the bottom further, boosting chances of a clean release. Just avoid removing the cake while it is still too warm, as that can cause cracks or tears. Letting the cooling process do its work ensures a smooth, blemish-free removal. For even better results, using a baking sheet for bacon can help distribute heat evenly and prevent sticking during cooking.
Step-by-Step: How to Unmold a Stubborn Cake Safely
To safely unmold a stubborn cake, follow a careful, step-by-step approach to prevent damage. First, loosen the edges by gently inserting a butter knife or thin offset spatula close to the pan wall, taking care not to cut into the cake. Recheck the center of tube or Bundt pans, as this area tends to cling more firmly. Lightly grease the knife if it starts to stick. Next, place a plate or cooling rack over the pan, firmly invert the cake, and let gravity do the work. Gently tap the bottom of the pan to encourage release without applying excessive force. Similar to how you would carefully handle thick crochet yarn to avoid knotting, patience during this step prevents damage.
If the cake resists, apply mild heat by wrapping a hot, damp towel around the pan for a few minutes. This causes the pan material to expand slightly, helping the cake loosen without drying out, and is similar to the principle of using baking soda paste to lift baked-on residue from cookie sheets. After warming, invert the cake again and leave it upside down briefly if it doesn’t drop immediately—patience here is crucial to avoid breakage. Repeated use of high-quality stand mixers can reduce the need for such rescue methods by ensuring an evenly mixed batter that bakes consistently. Once released, transfer the cake immediately to a rack. If one side remains attached, repeat the loosening and flipping process rather than forcing it free to prevent cracking.

Premium Cake Pan: The Gold Fluted Tube Cake Pan offers professional-level results; it measures 9.49 inches in diameter and 3.37 inches deep

Genuine Bundt pans are made of durable cast aluminum to achieve the most crisp, intricate cake detail possible
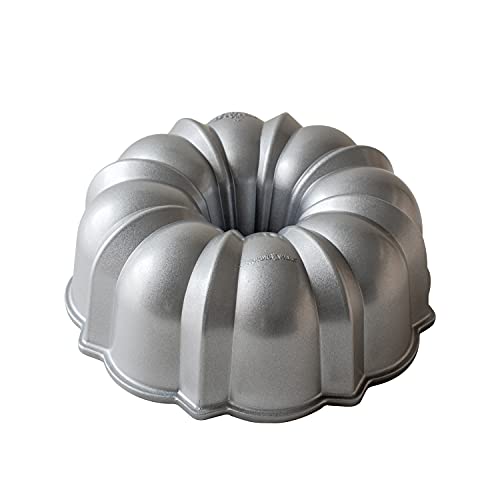
Genuine Bundt pans are made of durable cast aluminum to achieve the most crisp, intricate cake detail possible
Save a Broken Cake With These Simple Fixes
To salvage a cake that’s fallen apart mid-release, you can use frosting as edible glue to repair the damage. Brush buttercream into cracks and broken edges to press the layers back together effectively. Once you’ve realigned the pieces, immediately chill the cake to set the bond. After chilling, apply a crumb coat to hide seam lines and create a smooth surface for final frosting. This method works best for minor damages and ensures your cake looks good without starting from scratch. For even better results, placing the cake on a proper cooling rack allows air to circulate evenly after chilling. If you often bake from scratch, using a Hamilton Beach stand mixer with its attachments can ensure consistent batter texture, reducing the risk of cakes sticking or breaking in the first place.
Never Get Stuck Again: Greasing and Lining Tips for Perfect Release
To ensure your cake releases easily, start by coating the entire pan with a thin, even layer of softened butter or baking spray. Cover all corners and edges thoroughly to prevent any bare metal from sticking. When using butter, ensure it is softened for the most even coating. Once coated, cut a parchment paper round to fit the bottom perfectly and press it flat inside the pan. Lightly grease the parchment as well to stop the batter from bonding to it. Then, either flour the greased sides or use cocoa powder for chocolate cakes to avoid white streaks in the final result. Finally, tap out any excess flour or cocoa powder to prevent clumping. These steps create a reliable barrier that ensures your cake slides out smoothly every time. For efficient kitchen prep, reusable piping bags save money and reduce waste compared to disposable ones. For a similar approach to decorating, you can save money by making homemade piping bags instead of buying them.

BAKE AGAIN AND AGAIN WITHOUT DISPOSABLE LINERS: Upgrade from thin, flimsy parchment papers to this 0.7mm silicone baking sling. Reinforced handles lift cakes and bread effortlessly, while the nonstick surface releases food cleanly and rinses in seconds. Durable, eco-friendly, and reusable for 2,000+ bakes—our included reusable silicone liner helps reduce waste and saves money with every batch.

PREMIUM QUALITY: Our cake pan liners are designed with food grade paper, non toxic, eco-friendly, 100% safe. Heat resistance up to 446 ℉ /230 ℃, perfect for cake pan, cheesecake pan and so on.

Size/Color: Package includes 200 pieces natural parchment cupcake liners. The bottom diameter is 1.97 inches (5 cm) and the height is 1.37 inches (3.5 cm), fitting perfectly into a standard muffin or cupcake pan.