

Are you wondering how to get started with decorating bags, especially if you’ve never tried piping before? The right techniques and tools can make a big difference in creating clean, professional-looking designs.
Whether you’re working on delicate details or large decorations, understanding the basics will help you pipe with confidence. Keep reading for simple tips and tricks to improve your piping skills from the start.
Pick the Right Decorating Bag and Tip for Your Design
The right decorating bag depends on your design and icing consistency. For fine details like lettering, opt for a small disposable or flexible plastic bag— usually 3 to 6 inches long— because its smaller size offers better control and precision. For large swirls or frosting a cake, a 16-inch reusable or silicone bag provides ample room, reducing the need for frequent refills. Choose a sturdy bag made from heavy-duty plastic or silicone to prevent bursts under stiff icing, especially when applying pressure. A top rated food scale can help you measure ingredients precisely for consistent icing textures. For users who already own a stand mixer, KitchenAid mixer attachments can also streamline preparing thicker icings and batters.
Tip selection should match your design and icing thickness. Use round tips for writing dots and outlining; they produce clean, thin lines. Star tips are ideal for creating rosettes and shells, adding texture to your decoration. For flowers, petal and leaf tips are essential, shaping petals and foliage with ease. Tip numbers indicate the size of the opening: smaller numbers, like 1 or 2, create narrow lines, while larger tips, such as 12 or 16, handle big swirls or generous icing amounts. Be mindful that narrow tips can clog if your icing is too thick, so adjust your frosting’s consistency accordingly. A full piping tips chart can help you quickly identify which tip shapes produce specific designs like rosettes, shells, or leaves. Starting with one round and one star tip provides a simple, versatile setup suitable for beginners.

Food grade reusable silicone bags and PP plastic couplers is nontoxic, tasteless and BPA free. Silicone piping bag is reusable and eco-friendly, do not harm to the environment. Safe for your family.
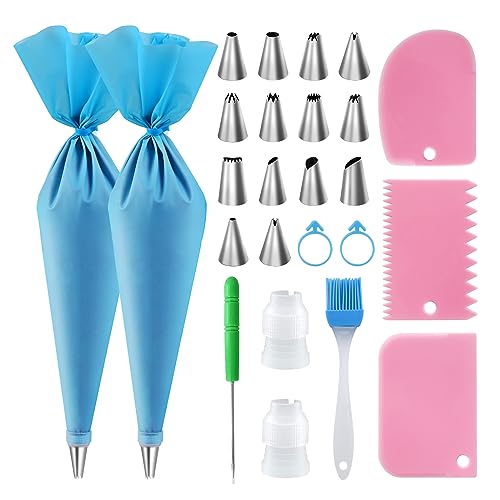
BUILT TOUGH TO HANDLE THICK BUTTERCREAM – This piping bag and tips set contains 7 different cake decorating kits which will give you everything you need for cake decorating! Includes 2 extra-thick 16inch food-grade reusable silicone piping bags, 14 stainless steel piping tips, 3 scrapers, 2 couplers, 2 icing bag ties, 1 sugar stir needle, 1 pastry brush. The silicone piping bags have a wall thickness of 0.2 mm, which is five times thicker than disposable piping bags. Reusing them greatly reduces waste from single-use disposable piping bags.

Includes 3X16" silicone pastry bags
Set Up Your Decorating Bag Without the Mess
To set up your decorating bag without making a mess, start by folding the top edge down about 3 to 4 inches to create a cuff. This wider opening keeps the outside cleaner and makes filling easier. Stabilize the bag by placing it inside a sturdy pint glass or jar, which leaves both hands free and prevents tipping. Use a spatula to scoop icing and gently scrape it against the rim of the bag to reduce drips and mess. Avoid overfilling; fill only up to halfway or two-thirds of the bag’s capacity. After filling, unfold the cuff and twist the top of the bag tightly to seal in the icing. Gently work the bag from the bottom up to push out any trapped air. Keep in mind that different bag materials might require slight adjustments, but following these steps ensures a clean, mess-free setup. Additionally, before filling, you can place icing in the center of plastic wrap and fold and twist the ends to create a sealed icing packet that can be fed into the piping bag for even less mess. For the bag itself, a quick rinse with warm soapy water after each use will keep it reusable and free of residue. For stubborn buildup, soaking in warm water can help lift baked-on residue without damaging the bag. Likewise, just as proper parchment prep prevents cake from sticking to the pan, a clean icing bag prevents clogs and frosting from sticking to the inside.

1. Eco-Friendly & Extremely Durable Silicone Say goodbye to single-use plastics. Crafted from premium, food-grade silicone, these reusable piping bags are engineered to withstand over 500 heavy-duty squeezes without stretching, tearing, or blowing out. It is a sustainable choice that significantly reduces kitchen waste while providing professional-grade reliability for your thickest doughs and buttercreams.

Riccle Piping Bags and Tips Set, 11.8 Inch 100 Anti Burst Piping Bags, 124 Pcs Cake Decorating Kit with 16 Piping Tips, 1 Reusable Pastry Bags, 3 Cake Scrapers

PROFESSIONAL SILICONE PASTRY BAGS: Compared with others,ELK's piping bags uses the 60HA elastic silicone, which is the perfect material for the piping tips set. The slight elasticity ensures its reusability, allowing the viscous liquids to flow smoothly inside. It won’t blow out even if you knead the thick batter with it. Its high stretchiness means that all of the squeezing efforts you make gets transferred to bulging sides as it stretches out, instead of forcing the frosting out the bottom.
Fill Your Decorating Bag Halfway and Tap Out Air Bubbles
Filling your decorating bag halfway to two-thirds full is essential for easy handling and preventing overflow. Overfilling can cause icing to squeeze out the top as you twist and grip the bag. To prepare, fold the top over a tall glass to create a steady cuff. Use a spatula to carefully push frosting into the bag in small, compact loads, pressing downward toward the tip. This packing technique reduces air pockets and ensures a uniform fill. Choosing the right fat content in your buttercream or ganache can also prevent the liner from slipping during this process. If you need to switch colors or store frosting for later, a lighter load allows for easier adjustments with less waste. After filling, gently tap the bag on the counter and massage it to release any trapped air bubbles. For those who also bake small loaves, a mini loaf pan with lid offers convenient portion control and storage. Finally, squeeze out the first bit of icing to clear the tip, which results in smoother piping every time. Twist the top of the bag to close securely, as described in managing security during preparation. Measuring your ingredients accurately with level measuring cups ensures your frosting has the correct consistency for easy bag filling and piping.
Hold Your Decorating Bag and Control Pressure Easily
Once you’ve filled your decorating bag and removed the air, focus on maintaining consistent pressure for clean piping. Grip the twisted top between your thumb and forefinger to ensure stability, while cradling the bulk of the bag in your palm for better control. Use your whole palm to squeeze, applying steady pressure rather than relying on your fingertips—this helps prevent hand fatigue and provides more even flow. Your dominant hand should squeeze consistently, while your non-dominant hand guides the tip for accuracy. It’s important to release pressure cleanly at the end of each stroke to avoid blobs or uneven lines. Keep re-twisting the top as the bag empties to maintain tension and avoid bulging from squeezing at the bottom. Practice adjusting your grip to switch between light and firm pressure, matching the needs of your design for smooth, professional-looking results. For dough-based piping like monkey bread, a nonstick bundt pan ensures the bag’s contents release cleanly after baking. To keep the bag stable as you work, wrap twisted parts between your thumb and forefinger to maintain consistent tension. For residue-free cleanup on your pans and baking tools, apply a paste of baking soda to lift stubborn baked-on residue.

Safety and sanitation cake decorating kit,Textured non-slip surface prevents slipping during delicate decorating work

16INCH LARGE CAPACITY: Our 16-inch large piping bags can hold a generous amount of cream, eliminating the need for constant refills. Whip up more delectable cakes and cookies in less time!

Thickness: 0.08mm, Bag size: 280mm X 530mm / 11" X 21"
Master Piping Angles, Distance, and Stop Points
Your piping angles, distance from the surface, and stop points are crucial for achieving precise and professional-looking designs. For stars, rosettes, and dots, hold your piping bag at a 90-degree angle, keeping the tip slightly above the surface to allow icing to flow smoothly and land in place. For borders, shells, and lettering, switch to a 45-degree angle, with the tip nearly touching the surface to create clean, sharp edges and consistent shapes. These angles influence how icing lands and stacks, affecting the overall appearance of your work. To maintain control, ensure the bag is filled only halfway to two-thirds full, as overfilling can reduce precision. Similarly, when working with hot materials, ensuring your equipment is rated for heat exposure is just as essential as mastering your piping technique—checking that black cooking gloves are truly heat resistant can protect your hands during baking tasks. For instance, if you were to place a baking sheet directly on the oven rack, manufacturers often warn about the material limits of cookware and potential warping. Applying a similar principle of proper preparation, greasing and flouring your pan thoroughly is a proven method to prevent sticking, just as mastering technique prevents piping errors.
Your stop points are just as important as your angles. Stop squeezing before lifting the tip to prevent sharp spikes or uneven peaks. When piping shells, ease off pressure as you move away from the design to produce a neat tail. For basketweave patterns, stop, then gently pull away for clean, defined lines. The key to a clean stop is easing pressure gradually, rather than snapping the bag shut. Keep the tip close to your surface to minimize wobbling—maintaining proper distance and controlled stop points ensures each element is sharp, smooth, and controlled.
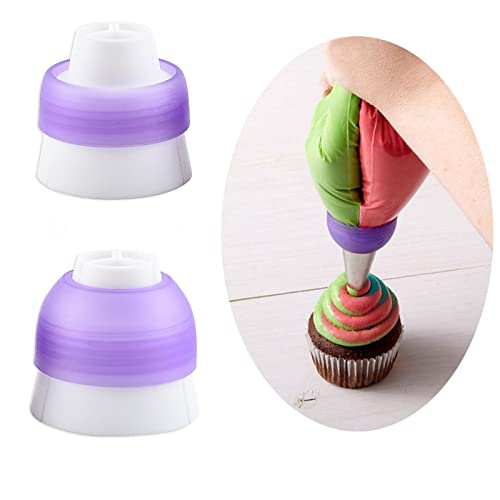
Package include: 2 * Nozzle Converter ( Big Size + Small Size )

VALUE FOR MONEY SET: Cake piping bags and tips contains 12 kinds of decoration tips, 2 couplers, 1 reusable silicone piping bags, and 100 disposable pastry bags. The extremely high cost performance allows you to start creating like a professional quickly.

Essential Cake Decorating Kit: 16 numbered stainless steel piping tips, 100 disposable pastry bags, 1 reusable piping bag, 2 reusable couplers, 2 bag ties, and 3 cake scrapers. With just a few key decorating tools, you'll be able to make cake decorating a piece of cake.
Practice 5 Beginner Designs With Your Decorating Bag
Practice five beginner designs with your decorating bag to build your piping skills. Start with basic dots using a round tip—squeeze gently and stop before lifting to prevent tails. Focus on maintaining consistent size and even spacing between dots. Next, pipe rosettes: apply steady pressure in the center and spiral outward, gradually increasing pressure to form a tight flower. Experiment with color combinations to make your rosettes stand out. Then, try piping shell borders by overlapping each shell onto the previous one, creating a smooth, continuous line. Practice tracing simple lines and loops on templates under wax paper—this helps develop control and precision. Finally, build shapes like leaves and stars, starting with simple outlines and progressing to more complex patterns. Use smooth, non-porous surfaces for immediate feedback on your technique. Dedicate 15 to 20 minutes each day to these exercises to develop consistency and confidence. Repetition will help your hand find a natural rhythm, making your piping smoother and more controlled over time. Using a tall cup to fill piping bags provides stability and control during the filling process, preventing spills and keeping the bag neat for beginners. You can also make your own bags by following a step-by-step guide for folding parchment paper. After practice, avoid placing your tools in extreme dishwasher heat cycles that could warp plastic couplers or degrade silicone tips prematurely.
Fix 3 Common Decorating Bag Mistakes
To avoid common decorating bag mistakes, focus on three key points. First, do not overfill the bag; fill only halfway to two-thirds full to maintain control and prevent spills. Overfilling weakens your grip and causes messy leaks, especially with delicate materials like thin plastic. Refill in small batches as needed. Second, hold or twist the bag correctly. Keep the frosting settled toward the tip, then twist the top tightly closed. Avoid gripping the middle of the bag, which can push icing out the back. Use one hand to guide the tip and the other to apply gentle, steady pressure from your palm. Third, apply consistent pressure while piping. Too much pressure results in uneven lines or the tip popping out. Test your pressure on parchment paper first. If you’re mixing colors, use a separate bag for each hue to prevent muddying your designs. Consistent pressure is crucial for achieving clean, realistic details in piping. Just as in pour over coffee, maintaining a steady pour stream prevents splashing and ensures even extraction without a scale. A springform pan’s removable base offers similar control for releasing delicate desserts without damage. For a secure seal, check the latch before each use to ensure the pan is properly locked and won’t leak batter during baking. Correcting these issues will help you pipe smoothly and with confidence.

Affordable Piping Bags Combo: Package include 100 x disposable pastry bags, 1 x silicone pastry bags, 12 x stainless steel decorating tips, 3 x plastic scrapers, 1 x frosting couplers, 2 x piping bag ties. No matter your pro or novice, this affordable pack could meet your need.
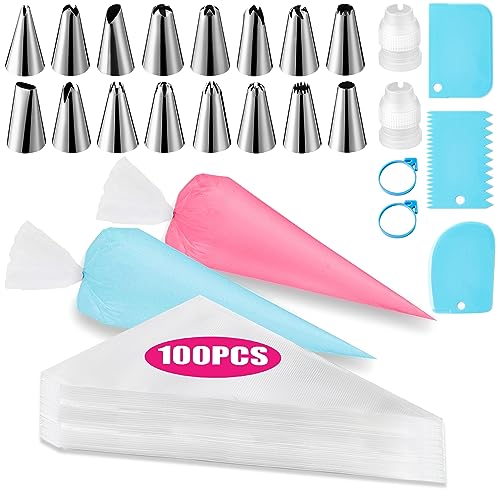
Cake Decorating Supplies: 100 pcs 12-inch large piping bags, 16 pcs stainless steel frosting piping tips set, 2 pcs couplers for piping bags, 2 pcs piping bag ties, 3 x plastic scrapers. You will have all the necessary tools to decorate delectable cakes

Essential Cake Decorating Tools: Getting ready to decorate but not sure what tools you need? RFAQK offers a complete set that includes everything you need to start decorating Cakes like a PRO! 48 Numbered Easy to Use icing tips, with E-Book in PDF, a booklet and a complete video course showing the outcome of each Icing Nozzle,2 icing couplers, 20 disposable icing bags (12-inch), 1 Reusable pastry bag (12-inch), Flower nail & lifter, Cleaning brush, Storage box that keeps everything organized
Swap Tips and Clean Your Decorating Bag the Right Way
Swapping tips and cleaning your decorating bag efficiently are crucial skills for smooth decorating. To swap tips quickly, use a coupler. It allows you to loosen the ring, change the tip, and tighten it again without refilling the bag. Measure the tip’s width before cutting the bag opening to ensure a proper fit. Folding the top of the bag over gives you better control during setup. For even cleaner tip changes, consider using an outer bag or liner, which reduces frosting contact with the exterior during repeated swaps. For those using a stand mixer, a durable pasta attachment can simplify dough preparation for bag-based decorating.
Cleaning your decorating bag should start immediately after use. Turn reusable bags inside out to expose any residue. Wash them with hot, soapy water, and scrub corners and seams with a sponge or bottle brush for thorough cleaning. Rinse well to remove any remaining butter or shortening. Dry the bag completely before storing to prevent moisture buildup. Tips and couplers should be disassembled, washed, and dried thoroughly. Properly cleaning and drying these components ensures easier assembly for your next decorating session. Store bags with the top open to prevent creases and maintain their shape.
Refill Your Decorating Bag When One-Third Full
Refilling your decorating bag when it’s one-third full is essential for maintaining control and creating precise piping. Start by filling the bag to that one-third level, which offers the best grip and prevents the icing from oozing out the top as you pipe. When the frosting runs low, stop and fold the top edge outward into a cuff. Use a spoon to add small portions of frosting, pushing down firmly to eliminate air pockets and ensure smooth flow. After each refill, twist the bag’s top to concentrate pressure near the tip, preventing gaps and maintaining even flow. Using a tall glass to support the bag during refills provides stability and prevents messes.
For consistent color mixing, refill with the same batch rather than layering different shades, which can cause streaks. Keep the exterior of the bag wiped clean during refills, and support it in a tall glass to avoid messes. To store tips, always twist the bag closed before pausing; this keeps the flow steady and prevents the frosting from drying out at the nozzle. Refill often, but never exceed the one-third mark, as this maintains optimal control and prevents mishaps.