

Thinking about how to get the most out of your KitchenAid stand mixer? The secret lies in mastering the right techniques from the start. Knowing how to set the speed, switch attachments, and clean efficiently can make a big difference in your results.
Stick with me, and I’ll walk you through simple steps to help you achieve perfect baking every time.
Set Speed to 0 Before Every Attachment Change
Always set the speed to 0 before changing attachments on your KitchenAid stand mixer. This step is essential for safety and must be done every time you remove or install a tool. Waiting until the mixer fully stops ensures that no parts are moving, reducing the risk of injury or damage.
Additionally, unplugging the mixer after setting the speed to 0 provides an extra safety layer. Unplugging prevents accidental startups if you bump the control or mistakenly turn on the mixer during attachment changes. It’s especially important when working near the attachment hub or beater shaft. Many safety protocols recommend pairing speed 0 with unplugging to keep your hands safe. Never make attachment adjustments while the motor is running; always confirm the mixer is completely still and unplugged before proceeding. For even, consistent baking results, using the right pan can also improve your cake quality. For those exploring additional tools, choosing the best attachments for your specific recipes can greatly expand your mixer’s versatility. When not in use, a protective cover keeps your mixer clean and free from dust.
Choose the Right Stand Mixer Attachment for Your Recipe
The flat beater is your go-to attachment for everyday mixing tasks. It’s ideal for preparing cake batter, cookie dough, and frostings, providing consistent mixing with minimal effort. Its versatility makes it suitable for both light and medium-weight mixtures, such as mashed potatoes or meatloaf, handling them easily without overworking your ingredients. For perfectly smooth buttercream, the flat beater is the best stand mixer option for achieving consistent results.
Switch to the wire whip for whipped, airy textures. It creates maximum aeration, making it perfect for whipping cream, egg whites, or meringues to fluffy peaks. Adjust your attachment depending on the recipe’s texture—use the flat beater for denser mixes and the wire whip when you need volume and lightness. For best results, always start your mixer on low speed with the wire whip to avoid splattering. Use the adjustment screw to fine-tune the beater-to-bowl clearance if needed.
For pastry crusts, the pastry beater is your best option. It cuts cold butter into flour without overmixing, helping you achieve flaky pie crusts or tender biscuits. When working with yeast doughs, opt for the dough hook. It kneads bread, pizza, or pasta dough efficiently, developing gluten structure for a better rise and chewy texture. Always match your attachment to your specific task for optimal results. To keep your attachments lifting baked-on residue, soak them in hot, soapy water before scrubbing.
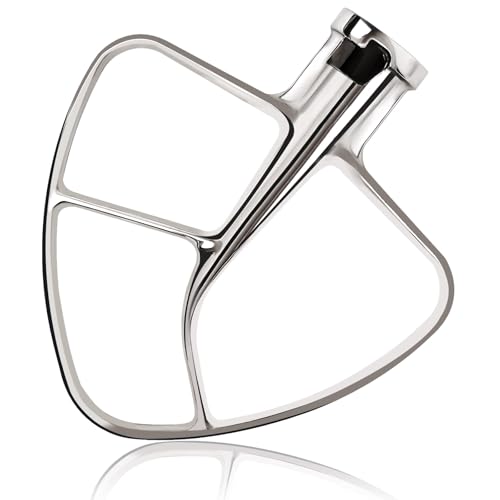
COMPATIBILITY: Stainless steel Paddle attachments Fits all 4.5 and 5 Quart KitchenAid Tilt-Head Stand Mixers perfectly.

Designed, engineered, and tested by KitchenAid

FITS 5 & 6 QT BOWL-LIFT: Precision-engineered replacement flat beater for KitchenAid Heavy Duty, Professional 5 Plus and Professional 600 bowl-lift series stand mixers, eliminating the frustration of wrong-size attachments by closing the bottom and sides of your bowl so no flour pockets are left behind during heavy mixing.
Pick the Perfect Speed for Every Mixing Task
To choose the perfect speed for each mixing task, start every mix on Stir or Speed 1. This low setting reduces splatter and gently combines ingredients. For yeast doughs and heavy batters, use Speed 2—it’s powerful enough to handle kneading and mixing without overworking the dough. Speed 4 is ideal for standard mixing and beating, such as preparing cookie or cake batters where medium consistency is needed. For creaming butter and sugar or whipping ingredients to a fluffy texture, Speed 6 provides medium-fast mixing. Reserve speeds 8 to 10 for whipping cream or egg whites, as these settings produce airy, stiff peaks with ease. Mastering these speed options guarantees you achieve the right mixing consistency every time. For heavy tasks like kneading bread, the flat beater is the optimal attachment for thorough mixing without strain. For perfectly baked cookies, silicone baking mats provide a non-stick surface that helps achieve even browning and easy release. Using a precise food scale ensures your ingredient measurements are accurate for consistent baking results.

Reduces mixing time when used on your KitchenAid 4. 5 and 5 quart tilt-head stand mixer

Made from high quality 100% stainless steel, this Flat Beater is designed for long-lasting quality and durability for everyday use

Durable Stainless Steel - This paddle attachment for kitchenaid mixer made from 100% food-grade stainless steel, no coating to chip or wear off. Say goodbye to paint flakes in your food!
Stand Mixer Techniques That Get Better Results Every Time
Using the correct attachment and setting it up properly ensures your stand mixer produces reliable results with less effort. Start by verifying compatibility for your specific model since bowl-lift and tilt-head designs require different configurations. Make sure the flat beater has enough clearance from the bowl, and consider using a flex edge beater, which continuously scrapes the bowl while mixing—this improves consistency and cuts down on manual scraping. When working with dough, it’s best to combine ingredients by hand first to break up initial clumps before switching to the dough hook. This helps with even development and prevents uneven textures. For dairy ingredients like butter and cream cheese, soften them beforehand so they incorporate smoothly and without lumps. Be aware that baked-on residue can sometimes transfer from poorly cleaned bowls or tools, so keeping your equipment spotless ensures better results. Layer your ingredients by adding dry and wet components in stages. Briefly stirring them together by hand before activating your mixer prevents flour from flying out and promotes a smoother batter. For precise liquid additions, using a clear measuring cup with a spout ensures accurate pours directly into the bowl. Following these setup methods consistently ensures that each batch turns out smooth, uniform, and ready for the next baking step. If your recipe calls for a specific pan shape that you lack, remembering the guide on Top Alternatives to a Bundt Pan can help you adapt the bake without compromising the final texture.
Common Mixer Tasks: Creaming, Kneading, and Whipping
Different attachments and speeds are key to each mixer task. For creaming, attach the flat beater and set the mixer to speed 6. Continue until the mixture becomes light and fluffy—that’s your sign that it’s properly mixed. Avoid overmixing, as it can affect the texture and outcome.
When kneading yeast dough, start by combining ingredients on low speed with the flat beater. Then, switch to the dough hook and run it at speed 2. If dry bits stick to the sides of the bowl, scrape them down and continue kneading. Keep going until the dough is smooth, elastic, and pulls away cleanly from the sides of the bowl. For a neat, long-lasting result, proper technique is essential when performing any mixing task. Using a quality loaf pan can also help ensure even baking when preparing sourdough. For best results with a hand mixer, consider using high-quality attachments that are designed for specific tasks.
For whipping cream or egg whites, use the wire whip. Chill the bowl and the ingredients beforehand to get the best volume. Begin mixing at a low speed, then gradually increase to speed 8 or 10. Stop once soft peaks form, indicating that your mixture is ready. Ensuring you use the correct attachment for each task is vital for optimal results.

Note: Compatible with almost all KitchenAid 4.5-quart and 5-quart tilt-head stand mixers. You can find your model on the bottom of the mixer. Compatible models include: K45, K45SS, KN15,KDM90, KA15, BEA30, RRK150, KSM45, KSM75, KSM85, KSM88, KSM90, KSM95, KSM96, KSM100, KSM103, KSM106, KSM110, KSM111, KSM120, KSM125, KSM150, KSM151, KSM152, KSM153, KSM154, KSM155, KSM156, KSM160, KSM170, KSM175, KSM177, KSM180,KSM195, KSM200

Why Choose a Spiral Dough Hook?Unlike C-shaped kitchen aid dough hook that just rotate and pull, this spiral dough hook actively pushes dough down while kneading.The spiral design creates continuous downward pressure that ensures even kneading of heavy doughs.

Anti-Rise Disc Baffle: Unlike ordinary hooks, this dough hook attachment for KitchenAid features a metal Disc Baffle that stops dough from spreading up onto the mixer’s hub and body while kneading. This clever upgrade protects your Kitchen Aid mixer accessories and keeps your machine clean during heavy mixing
Clean and Care for Your Mixer So It Lasts for Years
Always unplug your mixer before cleaning to prioritize safety. Avoid immersing the body; instead, wipe it with a soft, damp cloth and steer clear of harsh cleaners that could damage the surface. For bowls and attachments, hand-wash uncoated beaters in hot, soapy water and dry immediately to prevent oxidation and rusting. Many stainless steel parts are dishwasher-safe, but check your model first, as wire whips are often not dishwasher-friendly and may require hand washing.
Keep the beater shaft and mixer head free of residue by wiping these parts after each use. Regularly clean the planetary hub and attachment connections to prevent buildup that may impair performance. To maintain internal lubrication, run your mixer briefly at a high speed without ingredients; this redistributes internal grease. If you notice scraping sounds or unmixed ingredients, adjusting the beater height can resolve these issues—an important troubleshooting step.
Before storing, dry all parts thoroughly to avoid corrosion. Keep your mixer in a dry, dust-free place to extend its lifespan. Consistent cleaning after every use, combined with proper storage, ensures your mixer continues to work smoothly for years to come.